
 Neck pain can be worse than back pain for some people. In a modern society where you have to look down and turn your head to drive, it annoyingly reminds us of the sharp neck pain. As a Holistic Spine and Sports Medicine Physical Therapy clinic, we believe that neck pain is rarely an issue alone, but an underlying compensation pattern. If you read our article “Neck Pain” series, we dive into how under-appreciated and great a team player our necks are.
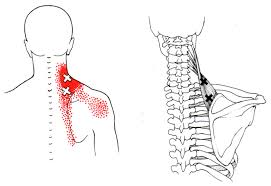
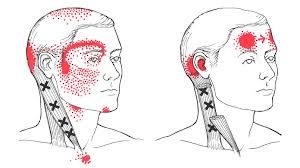
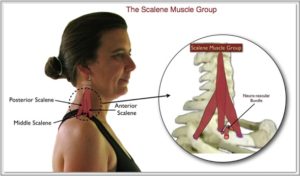
Our first article of this series “How to safely do yoga when dealing with neck pain (Part 1), we teach 3 tests that will help you to see if your neck has a hidden reactive neck pattern called trigger points. Reactive neck pattern means that these joint compressing muscles are working too hard to help you see the world and function. The problem is that these 3 muscles help you to turn your neck and this is why many have a hard time driving and looking over the shoulders when the neck spasms.
3 Problems with Yoga Neck Stretches
- There is no safe non-holistic yoga neck stretches when done in isolation due to the saying “our body plays together, works together”. When you practice the holistic methods of yoga, it can help many people feel better and stay active.
- True yoga practices endorse appreciating every slow movement of a pose, but modern fast pace flows make it hard to add a yoga neck stretch into these flows. Your body will struggle to target the neck dysfunction while you are trying to play catch up with the class.
- Yoga neck stretches do not address strength and stability factor. If you read below, the ability of our neck to move in multiple directions require finesse and muscle control. The power of a whip comes from the ability to harness the earth’s power with your legs and not the arm of the person or thickness of the whip.
We summarized the three common reasons that can worsen or trigger any underlying neck concerns when practicing yoga in Part 1. Part 2 talks about how to address the three pitfalls.
Pitfall #1: Weak upper body or history of upper body injury i.e. shoulder, elbow, wrist or nerve pain.
The saying that you are only as strong as your weakest link applies the most to your upper body. There are two ways to address this issue, and it is wise to do both ways for faster results. The first is to find what is the weakest link in your upper body. The latest fad or buzzword is functional exercises. The term implies that your body responds best when you perform complex movement pattern that mimics function. There is some truth to this, but the classic modality of training called isolated hypertrophy training is equally important from a joint sparing perspective. The best profession that will guide you is a Holistic Physical Therapist. If you live in Long Beach, we can provide this assessment for you. Click on the green button for your TELE-health consultation via Skype or phone chat.

In the meantime, start with a “Bird-dog” exercise maneuver. Get on all 4’s and raise opposite arm and legs up. Hold for 10 seconds. If this is easy, close your eyes and master this position. Alternate and repeat.
A great transition and progression from the bird-dog exercise are the Vinyasa. Check out the picture made by Yoga with Kassandra as she does a great job of slowing down the move so you can focus on the weak part of the flow. Perform the move at your pace where you are in control of the flow. If you feel that there are zones within the flow that you struggle, pause at that spot and allow your upper body to memorize this pattern. Isometrics
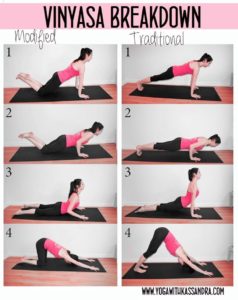
, freeze-framing a pose, is a great way of allowing your body to make this mind-body connection for a safer yoga practice. Perform 5-10 repetition daily for results in 2-3 weeks.
Pitfall #2: Weak lower back or history of lower back injury (with or without pain)
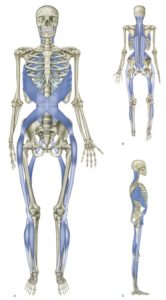
The architecture design of the neck allows us to see the world in many points of view.

Our neck needs to be tall and lengthened for height, while mobile for diverse ability to see what surrounds us from all directions. A great analogy that explains the importance of living in a tall and erect posture is a Spring Slinky. Our neck to torso connection is heavily comprised of muscles and fascia lines that have an oblique angle structure. When all of these slings are put as a whole, you can see there is a spiral sling design.
A spring slinky becomes moldable when it is lengthened. When the spring slinky is in its compact form, it takes more effort to twist and turn it. This analogy sets us to talk about the importance of one pitfall that many do not emphasize enough when starting yoga. Read our first article “How to Safely do Yoga When Dealing With Neck Pain (Part 1)” where we talk about 3 silent signs that indicate if your spiral neck muscles are stressed and dysfunctional and 3 common neck-stressing pitfalls when doing yoga. Our spiral sling loops around from head to toe. A spring loses its effectiveness when there is a kink in the system. Any history of low back injury or pain is a big fault that occurs when you do not completely rehabilitate the injury. We will give you two yoga poses that will help bring better “Spring slinky” function to your whole spine.
a) Easy Seated Twist (Sukhasana Parivrtti)
You sit crossed legged. Gently inhale deeply and attempt to expand your navel and pelvic floor region like a balloon taking in the air. As you are doing this, many of you will notice difficulty bringing your breath lower down towards your tailbone region. Attempt 3-5 reps of this before proceeding. Next, gently exhale and simultaneously place your left arm on your right knee as your right arm gently reaches behind you. With a relaxed chin, positioned down near your neck, nod your head sideways. Inhale and expand your navel and pelvic floor. Repeat on the opposite side.
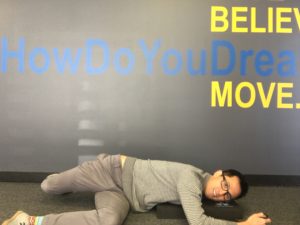
b) Belly-Down Twist
Lay down on a sofa cushion as pictured. Legs bent at 90 degrees but in opposite directions. Arms up to 90 degrees and outwards. Head and neck are well supported with a relaxed down chin position. Deeply inhale with an expanded navel and pelvic floor region. Repeat 3 times. Switch. The side that feels the most awkward or uncomfortable is the side you need to focus an extra 2 times.
Follow these two exercises with Dr Stuart McGill Big 3 exercises as written in Part 1 of this series. Watch the video here.
Pitfall #3: Lack of symmetrical single leg balance control
This is a low hanging fruit that is easy to address. The idea of testing to see if your balance is fair, good, or great is something you may not think about. If you have low back or neck pain, addressing this specific pitfall can help you tremendously. A good analogy is a tall tower building can be seen swaying based on how strong the foundation is.
If your neck, the highest point of your body, has to deal with this sway, your neck will have to stiffen up continuously to ensure you don’t walk around with a bobble-head phenomenon. This idea is one reason why a massage or adjustment may feel good when laying down but comes back as you are upright. Your main goal is to address the side that makes you feel uncomfortable and challenging. You can pick any stride and one-legged yoga pose, but here are two options.
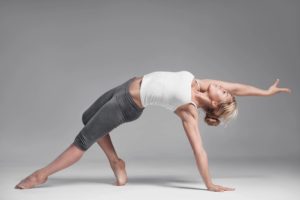
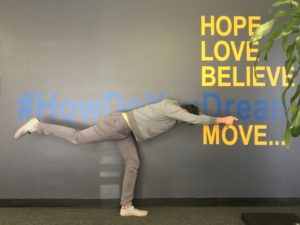 Warrior Pose III (Virabhadrasana III)
With a slight bend at your knee, slowly raise one leg back. The goal is to make sure your hips are level, where you can put a stick alongside your low back and it will not teeter-totter. If you feel advance, raise your arm up over your head.
Hold for 30 seconds and switch. Repeat 3 times.
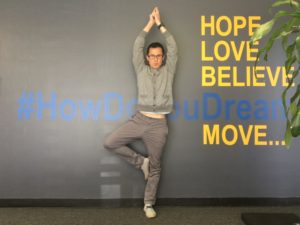 Tree Pose (Vrksasana)
Slowly lay your foot on your inner thigh. Stand tall and bring both hands over your head. Hold for 15 seconds and switch. Repeat 3 times.
If you miss our first article, click HERE to see if you have any underlying neck dysfunction that may show up later. If you need immediate neck care because of an injury or you need to advance your yoga practice, we offer a TELE-Health consultation where we can dive into what is holding you back from exercising safely. Click on the button and schedule your free TELE-health session. We offer in-person yoga-screen at our Spine and Sports Medicine Physical Therapy HQ in Bixby Knolls, Long Beach.
Namaste and good luck on your yoga practice,
Dr Danh Ngo
ReVITALize Rehab Club
Long Beach Spine and Sports Medicine Physical Therapy
562.548.0876